
How to Write Camera Prompts for AI Video: A Shot-First Guide
Turn camera ideas into clear AI video prompts with a shot-first method, precise movement and angle terms, adaptable examples, and practical fixes.
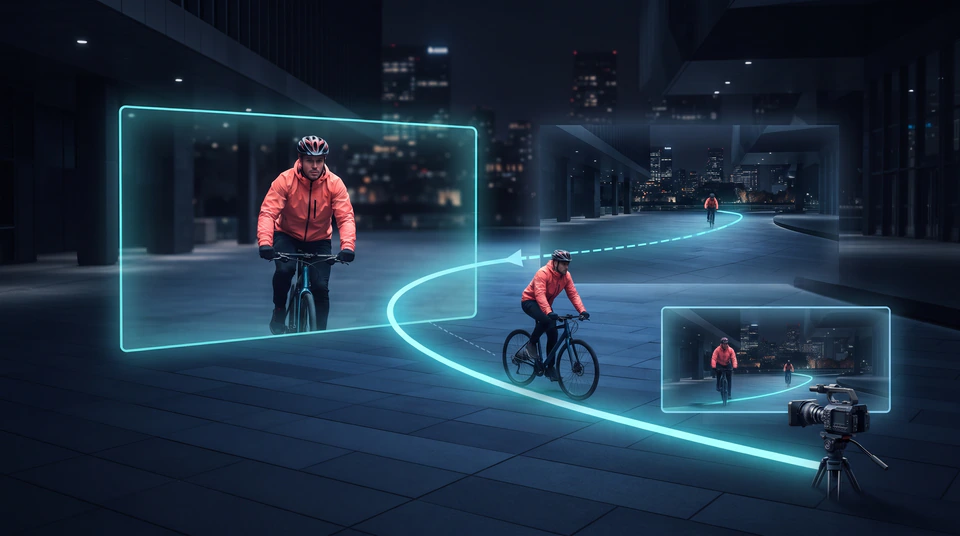
A camera prompt should describe a shot, not merely name a mood. “Cinematic camera movement” leaves the model to choose the framing, path, pace, and ending. A useful instruction makes those choices explicit:
Opening composition + camera position + one main move + speed + relationship to the subject + final composition
Here is the difference in one line:
Vague:
A cinematic video of a courier walking through a station, dynamic camera.
Directed:
Begin with an eye-level full shot. Track backward at the courier’s walking speed, keeping her centered as she crosses the concourse. Slow to a stop when she reaches the departure board and end on a steady medium shot.
The second version tells the camera where to begin, what to do, how its motion relates to the person, and where to land. That is the central idea of this guide. The camera vocabulary matters, but the structure around it is what turns a term such as “tracking shot” into usable direction.
You can apply this method in Videoify’s MiniMax H3 generator or Videoify’s Seedance 2.5 generator. Both currently provide text-to-video, image-to-video, and reference-to-video workflows. Prompt interpretation still varies by model and generation, so the examples below are starting points to test—not commands that guarantee an identical result.
Think in shots before you think in camera terms
Before choosing a movement, decide what the shot must accomplish. A push-in can emphasize a reaction. A pull-back can reveal scale. A lateral track can keep pace with action. A locked frame can make small changes easier to notice.
Use the shot’s purpose to narrow the camera choice:
| Shot purpose | A useful starting choice | What the viewer should notice |
|---|---|---|
| Establish a place | Wide or extreme-wide frame; static, pan, or slow aerial move | Geography and scale |
| Follow an action | Full or medium-full frame; tracking or trucking move | Subject motion and direction |
| Reveal information | Start tight; pull back, pan, tilt, pedestal, or rack focus | A new object, person, or part of the environment |
| Emphasize a detail | Medium or close frame; restrained push-in | Expression, texture, or product feature |
| Observe a process | Locked-off or gently stabilized frame | The action itself rather than camera performance |
| Create unease | Off-level or restricted framing; controlled handheld movement | Instability or incomplete information |
This prevents a common mistake: choosing an orbit because it sounds impressive even though the scene only needs a clear view of a person opening a package.
Separate four camera decisions
Camera prompts become easier to edit when you stop treating “the camera” as one setting. There are four distinct decisions.
Framing: how much appears
Framing sets the visual distance between the viewer and the subject.
-
Extreme wide: the environment dominates; the subject may be very small.
-
Wide: the full subject and meaningful surroundings are visible.
-
Full shot: a person is visible from head to toe.
-
Medium shot: expression and upper-body action share attention.
-
Close-up: a face or object detail controls the frame.
-
Macro: a small surface, mechanism, or texture fills the image.
Angle: where the camera looks from
AI camera angle prompts describe the camera’s position or viewing direction, not its travel.
-
Eye level: neutral and observational.
-
Low angle: looks upward and emphasizes height or presence.
-
High angle: looks down and reveals layout around the subject.
-
Overhead / top-down: points straight down, useful for arranged objects or choreography.
-
Over the shoulder: frames one subject from behind while looking toward another.
-
POV: shows what a character would see.
-
Dutch angle: rolls the horizon off level; best reserved for deliberate disorientation.
“Low angle” does not mean “tilt up.” The first places the camera below the subject. The second rotates the camera upward during the shot. You may combine them, but they describe different things.
Movement: how the viewpoint changes over time
Movement can rotate the camera, move its whole position, change the lens, or introduce operator-like instability. Those are not interchangeable.
Focus: where attention sits in depth
Shallow focus isolates one plane. Deep focus keeps several planes readable. A rack focus shifts attention from one depth plane to another while the shot plays. Rack focus is useful camera direction, but it is not physical camera movement.
Google’s official Veo prompting guide similarly treats cinematography as a distinct layer alongside subject, action, context, and style. MiniMax’s H3 guidance separates camera movement into the type of motion, its range, and its speed. The exact syntax is model-specific; the broader lesson is to give each visual decision a clear job.
AI camera movement prompts: use the physically correct verb
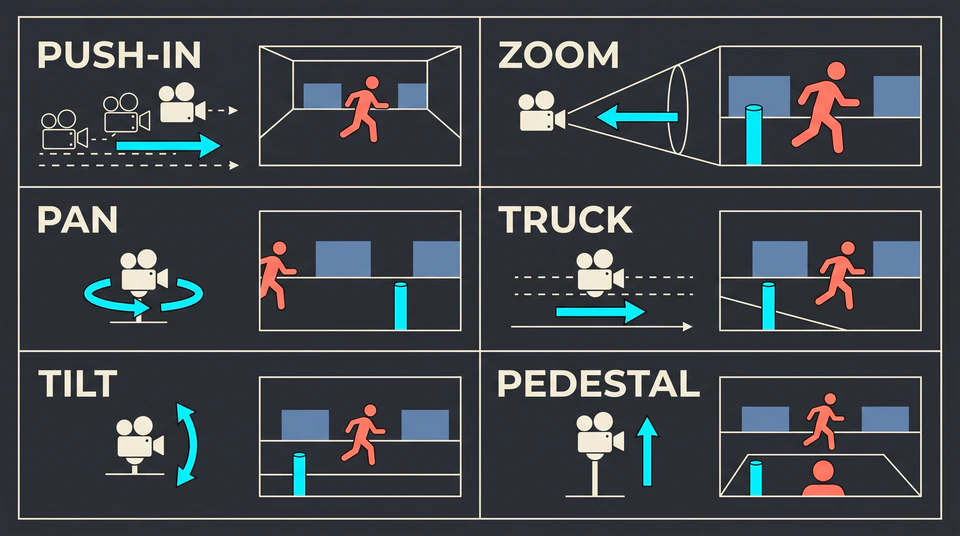
The quickest way to improve AI camera movement prompts is to say what the camera body actually does. These are the terms worth learning first.
| Prompt term | Physical instruction | Useful for |
|---|---|---|
| Static / locked-off | Camera position, angle, and framing remain still | Process shots, symmetry, motion inside the frame |
| Push in / dolly in | The whole camera moves toward the subject | Attention, intimacy, tension, detail |
| Pull back / dolly out | The whole camera moves away | Context, scale, reveals, endings |
| Pan left or right | Camera rotates horizontally from a fixed position | Following adjacent action or revealing side space |
| Tilt up or down | Camera rotates vertically from a fixed position | Revealing height or moving between vertical details |
| Truck left or right | The whole camera slides sideways | Parallel action and foreground parallax |
| Pedestal up or down | The whole camera rises or lowers without tilting | Clearing an obstacle or changing height |
| Tracking shot | Camera follows a moving subject | Walking, running, vehicles, moving processes |
| Arc shot | Camera travels partway around the subject | A dimensional reveal without a full circle |
| Orbit | Camera circles the subject | Hero views and inspection from several sides |
| Crane / aerial rise | Camera travels through a large vertical range | Moving from detail to scale |
| Handheld | Small operator-like variations affect framing | Documentary texture, urgency, proximity |
Push in versus zoom in
A push-in changes the camera’s position. Nearby and distant objects shift relative to one another, creating parallax. A zoom changes focal length while the camera remains in place, so the subject grows in frame without the same spatial travel.
If the distinction matters, write it plainly:
The camera physically moves forward from a medium shot to a close-up; foreground shelves slide past the frame edges and the room’s perspective changes. No lens zoom.
Pan versus truck
A pan pivots left or right from one position. A truck move carries the entire camera sideways. Use a truck when you want foreground objects to pass across the frame or when the camera must travel parallel to a moving subject.
Tilt versus pedestal
A tilt points the lens upward or downward. A pedestal move raises or lowers the whole camera while its orientation stays level. “Pedestal up above the counter” is therefore different from “tilt up toward the ceiling.”
Build the camera instruction in six passes
You do not need to write the perfect sentence at once. Build it in layers and stop when the shot is unambiguous.
1. Lock the opening composition
Start with framing, angle, and subject position:
Eye-level full shot. A bicycle mechanic stands on the right side of a narrow workshop aisle, with a red touring bike on the left.
Now the movement has a known starting point.
2. Describe the subject’s action separately
Write only what the subject does:
She rolls the bicycle toward the open garage door, stops beside the threshold, and turns the handlebars toward camera.
This helps expose impossible timing before camera movement complicates it.
3. Give the camera one main path
Add a movement, direction, and pace:
The camera tracks backward slowly along the aisle.
“Slowly” is enough when exact timing is not important. If a move must fill a specific part of the clip, use a time span such as “over the first five seconds.”
4. Connect the camera to the subject
The model should not have to guess whether the camera leads, follows, matches, or ignores the action:
The camera tracks backward at her walking speed, maintaining the same distance and keeping her full body and the bicycle in frame.
For AI filmmakers, this relationship clause is often more useful than adding another movement keyword.
5. Give the movement a reveal
Say what becomes newly visible:
As they approach the door, daylight spreads across the frame and reveals a quiet tree-lined street outside.
The reveal turns camera travel into visual storytelling instead of motion for its own sake.
6. Write the landing
Finish with an edit-ready state:
The camera slows to a complete stop at the doorway. End on a stable medium-wide composition with the mechanic and bicycle in profile, and hold for the final second.
Combined, the full prompt reads:
One continuous shot. Eye-level full shot inside a narrow bicycle workshop. A mechanic in a navy work shirt stands on the right with a red touring bike on the left. She rolls the bicycle toward the open garage door, stops beside the threshold, and turns the handlebars toward camera. The camera tracks backward at her walking speed, maintaining the same distance and keeping her full body and the bicycle in frame. As they approach the door, daylight spreads across the scene and reveals a quiet tree-lined street outside. The camera slows to a complete stop at the doorway. End on a stable medium-wide composition with the mechanic and bicycle in profile, and hold for the final second. No cuts and no zoom.
Camera prompt examples organized by the job
These original examples are designed to be edited. Swap the subject and environment, then keep only the camera choices that still serve the new scene.
Reveal a product without losing the label
Table-height medium close-up of a forest-green field radio on pale stone. The camera makes a slow 70-degree arc from front-left to front-right while the radio remains still. Keep the tuning dial sharp and the label facing the center of frame throughout. A thin highlight travels across the metal edge. Settle on a stable three-quarter view and hold for one second.
Follow a moving subject at a readable pace
Eye-level full shot of a cellist carrying a black instrument case through an empty rehearsal hall. The camera trucks left parallel to her at the same walking speed, maintaining a constant distance. Music stands pass through the near foreground to create gentle parallax. End when she reaches the open stage door, still framed head to toe.
Turn a reaction into the point of the shot
Medium portrait of a night-shift baker facing an oven window. He watches the first loaf rise, then gives a small relieved smile. The camera physically pushes in with small amplitude from medium shot to close-up over five seconds, keeping his eyes in focus. Warm oven light moves across his face. Stop after the smile and hold the close-up without drift.
Reveal scale from a human starting point
Begin at shoulder height behind a surveyor standing beside a single wind turbine at dawn. The camera pulls backward and rises gradually, keeping the surveyor centered as more turbines appear across the valley. End on a high wide shot that shows the full ridge and low morning fog. No cut and no sudden acceleration.
Observe handwork without camera distraction
Locked overhead shot of a bookbinder folding a sheet of cream paper on a dark green cutting mat. The camera remains entirely motionless. Only the hands, paper, thread, and small tools move. Keep the table edges square with the frame and preserve the same composition until the fold is complete.
Redirect attention without moving the camera
Static close shot in a quiet train compartment. Focus begins on a stamped ticket in the foreground. When a passenger enters the background and sits by the window, rack focus slowly from the ticket to the passenger’s face. The camera position and framing do not change. Hold focus on the passenger through the final second.
Create restrained handheld urgency
Chest-height medium-full shot following a paramedic walking quickly through a bright hospital corridor. Controlled handheld camera with small natural operator movement, never violent shake. The camera follows two meters behind and keeps the paramedic centered while staff pass at the frame edges. End as the paramedic stops at a closed treatment-room door.
Adapt the same shot to each Videoify workflow
The camera direction does not need to change completely when you switch workflows. What changes is how much visual information the prompt must supply.
Text to video: establish everything the camera will see
Text-to-video starts without a visual anchor, so include the opening composition, subject, environment, action, camera path, and ending.
Wide eye-level shot of a rain-darkened ferry terminal at blue hour. A traveler in a yellow coat crosses from left to right, pulling one silver suitcase. The camera trucks right at her speed, keeping her full figure centered as pillars pass in the foreground. End on a medium-wide shot when she stops beneath gate number four. One continuous shot; no zoom.
Image to video: prompt the change, not the still image
The uploaded first frame already supplies appearance and composition. Repeating all of it spends words without clarifying motion. Protect what must remain stable, then describe the change:
Preserve the woman’s face, yellow coat, suitcase, and the terminal layout from the first frame. She begins walking to the right at a natural pace. The camera makes a small, steady truck-right move parallel to her, keeping the original eye-level angle and full-body framing. Reflections ripple on the wet floor. End after she stops beside the gate, with no cut, no zoom, and no change of wardrobe.
Large arcs and orbits may expose sides of the subject or setting that a single source image never defined. If stability matters more than spectacle, begin with a push-in, pull-back, small truck, subtle pan, or locked frame.
Reference to video: assign the camera reference one job
If an uploaded video demonstrates the movement you want, state exactly what to borrow and what to leave behind:
Use Video 1 only for its slow rightward tracking path, steady pace, and final deceleration. Use Image 1 for the traveler’s face, yellow coat, and silver suitcase. Create a new blue-hour ferry terminal. Do not copy the person, clothing, or station from Video 1. Keep the traveler centered while the camera matches her walking speed, then settle beside the gate in a stable medium-wide frame.
Reference-led generation provides guidance rather than deterministic motion capture. Review whether the path, subject, and final framing survived together before accepting the clip.
For the surrounding prompt structure, see the MiniMax H3 prompt guide or the Seedance 2.5 prompt guide.
Use timing only when the camera has distinct phases
One move usually reads more cleanly than several competing moves. If the shot genuinely changes direction, write the visible phase change instead of stacking verbs:
0–4s: Begin in a waist-high medium shot beside the potter. Make a slow clockwise arc while she lifts the finished bowl from the wheel.
4–8s: Continue the same arc and rise slightly above the table, revealing three glazed bowls behind her.
8–12s: Stop the lateral movement and settle into a high-angle medium-wide composition with all four bowls visible. Hold the final frame.
The timeline explains what each phase reveals. “Arc, rise, pan, and zoom” does not. If the generated shot still blends the phases into aimless motion, separate them into individual clips and edit the sequence afterward.
Diagnose a camera failure from what appears on screen
Do not rewrite the whole prompt after every imperfect result. Find the first visual mismatch and edit the clause responsible for it.
| What you see | What may be unclear | A focused revision |
|---|---|---|
| Camera drifts instead of following a path | The instruction names a mood, not a physical move | Replace “dynamic” with one movement, direction, and destination |
| Subject appears to slide | Camera and subject motion have no stated relationship | Add “follows,” “leads,” “matches her pace,” or “holds while” |
| Push-in looks like digital magnification | Physical travel is not explicit | Add “camera body moves forward,” foreground parallax, and “no zoom” |
| Pan becomes sideways travel | Rotation and translation are mixed | Add “from a fixed position” for pan or “whole camera slides” for truck |
| Image-to-video geometry warps | The move asks the model to invent too much unseen space | Reduce the range or choose a move that respects the first frame |
| Framing becomes too tight during action | No distance or subject boundary is protected | Specify constant distance and what must remain inside the frame |
| Unwanted cut appears | The prompt jumps between compositions without a path | State “one continuous shot” and describe the transition |
| Camera never comes to rest | No final state is written | Add a destination, deceleration, and final hold |
| Handheld becomes chaotic | The degree of instability is undefined | Ask for small, controlled operator movement and stable subject framing |
Keep the base scene unchanged while testing a camera clause. A simple comparison might use the same subject and setting with three variants: static, slow push-in, and slow pull-back. Watch the opening frame, path, relative subject size, background behavior, and ending. This isolates the camera decision instead of mixing it with a new character, light, and action every time.
A reusable shot-first template
Copy this as a drafting checklist, then remove any field that does not affect your scene:
[One continuous shot or planned shot count].
Opening: [shot size], [camera angle], [subject position], [important foreground/background relationship].
Subject: [visible action in playback order].
Camera: [one main movement], [direction], [speed or duration], [range if useful].
Relationship: the camera [follows / leads / tracks beside / holds while] [subject action], maintaining [distance or framing rule].
Reveal: [what becomes visible and when].
Ending: [camera deceleration or stop], [final composition], [optional final hold].
Continuity: preserve [identity, object, wardrobe, layout, or first-frame details].
Avoid only relevant conflicts: [no cut / no zoom / no viewpoint change / no abrupt shake].
Read the finished prompt once as a physical plan. Can the camera occupy the opening position? Can it follow the path without contradicting the angle? Is there enough time for the subject action? Does the shot end somewhere useful? If those answers are clear, the prompt is ready for a controlled generation.
Camera language cannot remove variation from generative video, but it can remove avoidable ambiguity from your brief. Choose the job of the shot, separate angle from movement, connect the camera to the subject, and write the final frame before adding stylistic detail. Then take that camera block into Videoify, select the workflow that matches your source material, and revise one visible failure at a time.